

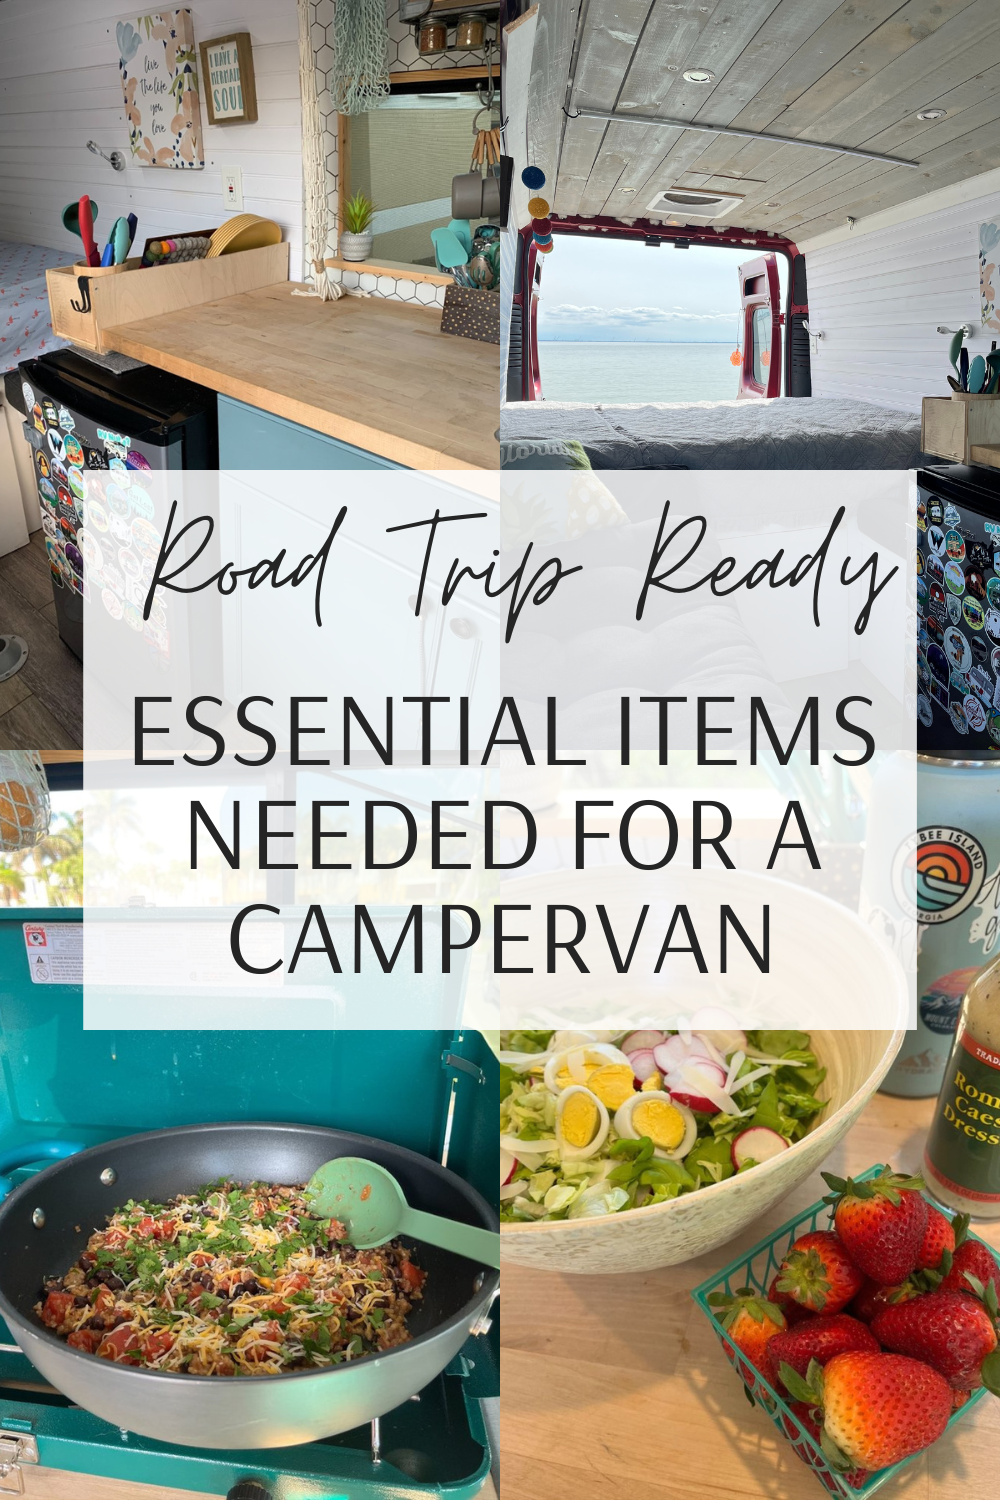
Road Trip Ready: Must Have Essential Items for Your Campervan
Disclaimer: This post may contain affiliate links. This means I may receive a small commission at no extra cost to you. The reviews of the items in this article are based on my own opinions. Disclosure policy https://www.adoptinglifesjourney.com/blog/disclosure-policy
Must have items for successful boondocking in a campervan
Embarking on a boondocking adventure in a campervan promises an unforgettable escape into the wilderness, where you can not only save money, but you will find yourself becoming in tune to a natural setting. Venturing off-grid requires preparation and the right equipment to ensure a comfortable and enjoyable experience.
You will navigate remote terrains and learn to be self-sufficient when you equip your campervan with essential items to make your boondocking experience successful. Whether you're a seasoned camper or this in your first experience, making sure you have the right gear will make all the difference in transforming your boondocking journey into an unforgettable experience.
I am going to show you must have items you will need in your campervan for boondocking. After purchasing our van in 2021, I needed to find practical things for my van that would make our travels comfortable. We purchased a 2017 Ram ProMaster high-top and absolutely love this model and highly recommend it. Through research and our own travels in our van, I have decided that the following items are needed for a successful journey.
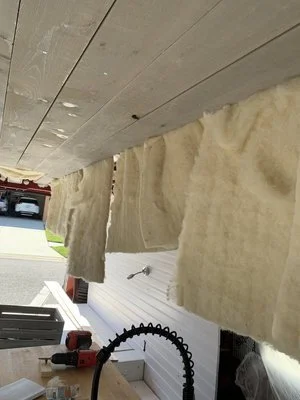
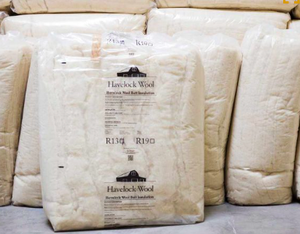
Havelock Wool insulation
The first thing I knew I needed in the van was good insulation. I wanted to find a product that was sustainable and with a lot of research I concluded that Havelock wool would be best for our van. Havelock wool has the ability to improve air quality by releasing moisture and regulating the temperature within the van with an R value of 3.6 per inch of the batts. This wool also has the ability to absorb harmful chemicals which greatly improves the air quality.
With all of those positive qualities it was clear that this product would be the best for van life since moisture can get trapped between the metal walls and the insulation in the van which could cause mold over time, this insulation should protect that from happening.
This wool tends to be little bit pricier, but it is so worth the investment. Our van wasn’t going to have an air conditioner so I knew it would be important to have a higher quality insulation product.
You can see the Havelock wool hanging from the ceiling below as we were building it. I tucked it up in the ceiling as I put up the wood. I also put it in the sides of the van as I built up the walls.

HORSE DRAWN CARRIAGE RIDE
Enjoy a horse drawn carriage ride in historical Charleston, South Carolina. (photo courtesy of Viator)
MaxxAir Ventilation fan
Since our van wasn’t going to have air conditioning once it was shut off, I knew we would need fans at night to keep the air moving and for noise. After some research, I knew that the MaxxAir ventilation fan (pic C) was a popular choice, so I had it installed to bring cooler air into our van at night. This fan has different speeds so we could control how much air came in. You can also reverse the fan to suck the warm air out. You can purchase this fan with or without a remote. I chose the fan that did not have a remote to save money and so I didn’t risk losing it as we traveled. The fan has a knob you turn to open and close it where if you had the one with the remote, it would do this for you. The fan will only work when hooked to power or when our battery is charged.
Update: We have used this fan for a couple of years now and although it works great at pulling in cooler air at night, it does not seem to blow the air straight down, but off to the side instead. Despite this, it definitely helps to keep our van cool.
Battery operated fans
I purchased several small fans to also help keep us cooler while in the van. I have purchased fans that are battery operated, but also plug in if we are connected to power, to provide some air flow at night. The first fan (pic A) connects to our front seat and provides some air through the night. You charge this fan with the cigarette lighter plug as you are driving and then unplug and use at night. The cord is very short for this fan and the charge only lasts for about 6 hours. The exact fan shown is no longer available so the one in the link is comparable. What I love about this second fan (pic B) is that it plugs in but also uses batteries when not connect to power. Check it out this battery-operated fan.
Batteries
The fans take 4 D batteries. I noticed that the warmer the weather, the less charge the batteries kept. We had to change the batteries more often, so it is important to make sure you have extra batteries at all times. When the weather is cooler the batteries will last a long time. This fan tilts up and down so you can adjust the fan to meet your needs. If you are plugged into power, you won’t need the batteries, but you will want to stock up on them before you travel.
Van window coverings
I bought window coverings (pic D- side windows) and front window covering for a couple reasons. One was to keep the sun out of the van when we were not driving, and I can definitely tell a difference. They do a great job at keeping it cooler in the van and second, they provide privacy so people cannot see inside the van at night, and it keeps the space darker when we were sleeping. These are definitely worth the investment.
Update: Since having these for a couple of years, the suction cups that hold the side window coverings to the window, do not stick as much anymore. I usually have to put something up against them to hold them against the window.

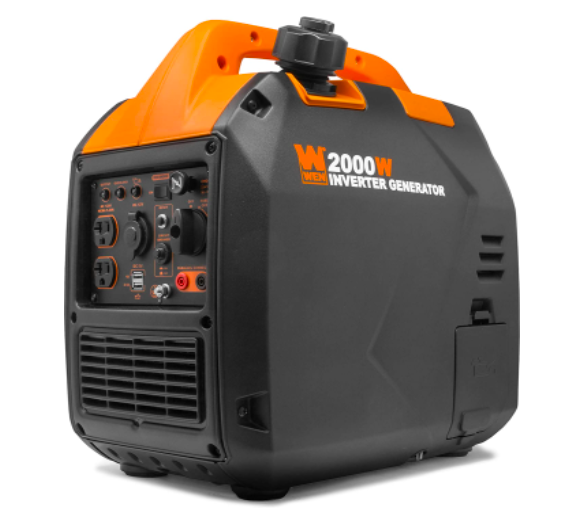
WEN generator
Our van does not have solar panels, and it does not have a way to charge the batteries while I am driving. Because of this, I knew I needed to find a way to charge our batteries when we are parked and boondocking. If we use a campground, which is rare, we could plug into shore power and charge our batteries, but when we are boondocking I needed a way to charge the batteries and I knew a generator could do just that. The company that installed the electricity in our van (Tampa Bay Food Trucks), recommended the WEN generator. This generator is comparable to a Honda generator and is super quiet when in use. It will charge our battery and the charge will last all day. If the gas tank is full the generator will run about 10-12 hours. You can also plug into the generator while it is charging for an added power source. I purchased it for around $430 in 2021 and the price is still the same in 2024.
Memory foam mattress
In order to sleep well while traveling, it is essential to have a good mattress. We have been using this Tea memory foam mattress for several years now and I am happy with the product and quality. We currently have the 6-inch one, but if you are wanting a thicker mattress, you could use the 8-inch one. I purchased the FULL-size mattress for our campervan, and it fits perfectly! You will sleep with your body going across the van from side to side.

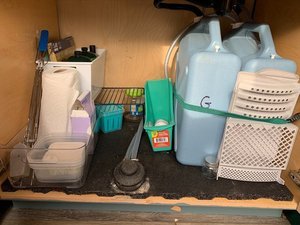
Van kitchen setup
Since we would be camping in our van, I knew I would need to have a small kitchen setup for cooking. I also needed to have access to water for cleaning and washing our hands. Although the space is small, I was able to fit a small cabinet with a smaller fridge inside to meet our cooking needs.
I bought an unfinished base cabinet from Home Depot and painted it a blueish/gray color, then added a butcher block countertop to the top. I added a stainless-steel bar sink and faucet which I purchased from Amazon. I added two water jugs, one for fresh water and one for gray water and used a foot pump that would circulate the water. The foot pump has worked well for us on our multiple trips, but I cannot say it is my favorite setup. There are electric pumps you can also purchase that might make this setup easier, but for a cheaper version this setup will work. I take an extra jug of water on our travels for emergencies but have never had to use it as we are always able to find water spigots to refill as needed. I use the iOverlander app which shows you where water spigots are located throughout the US.
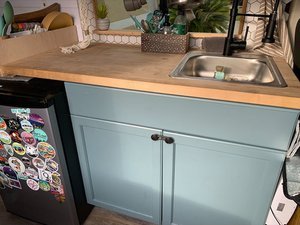
Dorm size refrigerator
The 4.3 cu ft refrigerator we use in our van was purchased at Target and fits perfectly under the cabinet. It is just the right size to fit our food for smaller trips and the freezer space is pretty small but has worked well for us.
I added my sticker collection from @rvstickerclub on Instagram to the fridge door.

Extra kitchen accessories
To complete the kitchen area and make it feel a little homier, I added a peel and stick tile (that one is unavailable at this time, this one is comparable) to the wall behind the sink which also provides some protection from splashes of water or food. I also added the shelf above the sink to store spices and some food items. I have used this peel and stick tile on a couple different projects and have really had good luck with it and have really liked how it looked. It is very sticky and stays on the wall good.
You can see the hanging fruit basket that we store our apples and bananas in while we travel. You can purchase two of them and store potatoes or onions in the second one. This basket does swing as we travel so watch for that as it can bruise the fruit. I love my hanging basket though!
I also love our tea kettle that we use to boil water on our campfire stove for our oatmeal. It has worked so well for us and fits on our countertop space perfectly.
More kitchen essentials
heavy duty Velcro with adhesive to hold things onto the countertop as you travel, cut to the size you need
Where will you travel?
Once you are comfortable in your campervan, it is time to start traveling. Here are a few places I know you will enjoy visiting. Click the links below for more details:
Before you begin your boondocking journey, make sure you have the needed items that will make your travels more comfortable. The items listed here are items that I have found useful as we boondock across the US and are out in the middle of nowhere without any amenities. We use each of these items every time we go camping and although everyone’s needs will be different, each of these items are necessary for making your campervan experience more comfortable.
I hope this list is helpful for you as you start out on your new journey. Camping in a van has become a passion of mine but I want to be comfortable while doing it. I will add to this list as we travel and discover more things that are important for us to have. Bookmark this page for future reference.
To see the cost of our van build, check out my blog post.
What is your must have item while boondocking? Comment below.
Enjoy the journey,


Meet the author: Jennifer
I’m just a girl who loves to travel. My favorite travels have been traveling across the US in a campervan, visiting all-inclusive resorts in Mexico, marking National Parks off my list, & many smaller trips. I love to share my adventures to inspire others to travel more. If you can dream it, you can do it!
Like this post? Pin it for later ❤️


Discover the best free and cheap camping in Florida, including wildlife management areas, scenic forests, wildlife areas, and budget-friendly campgrounds. Perfect for families, nature lovers and RV travelers.